This DIY describes how to capture the latest English metric INPA scripts and configuration files from INPA 5.0.2 and manually integrate them along with SP Daten 50.2 for a fully functional installation of BMW Standard Tools 2.12. This approach is necessary for 3 reasons. 1) BMW Standard Tools includes INPA, but it does not contain any INPA scripts or configuration files. 2) The latest INPA scripts are in German which is why we preserve the English scripts from INPA 5.0.2. 3) The latest SP Daten files are German metric and do not work properly with INPA 5.0.2 and friends.
BMW Standard Tools 2.12 includes INPA 5.0.6 for diagnostics, NCS-Expert 4.0.1 for coding, WinKFP 5.3.1 for flash reprogramming, and a host of other BMW Group plant support tools. The software was not intended to be used by your neighborhood BMW dealer. There is also a development release of BMW Standard Tools which includes PAFMaker, SWE-Generator, XBD-Generator, Muster-PABD, P-SGBD, etc. and supports Vector CAN interfaces. The development release is outside the scope of this DIY.
The software is complicated and requires a significant effort to understand. If your technically astute, comfortable with Microsoft Windows administrative tasks, and want to learn to manually install the software and integrate the SP Daten files on which it depends, this is the right DIY for you.
This DIY is not intended to be the “easy button.” If you want a mixture of BMW software, third-party software and data files of unknown origins pre-configured for you because your in a rush to try your new cable, look elsewhere. There are even forum members who can assist you remotely for a “donation.”
I am not an expert, nor did I provide the software. ECU coding and flash reprogramming come with inherent risks, there is always the possibility of catastrophic failure. Your car should always be attached to a microprocessor controlled charger that adapts to the cars current draw and supplies constant, clean power. (i.e. Don Schumacher Racing INC-700A) Please refer to the OSS applications documentation (page 8) for BMW Group recommended charger specifications:
http://www.e90post.com/forums/attach…mentid=691959&
THIS DIY IS PROVIDED “AS IS” AND ANY EXPRESSED OR IMPLIED WARRANTIES, INCLUDING, BUT NOT LIMITED TO, THE IMPLIED WARRANTIES OF MERCHANTABILITY AND FITNESS FOR A PARTICULAR PURPOSE ARE DISCLAIMED. IN NO EVENT SHALL I BE LIABLE FOR ANY DIRECT, INDIRECT, INCIDENTAL, SPECIAL, EXEMPLARY, OR CONSEQUENTIAL DAMAGES (INCLUDING, BUT NOT LIMITED TO, PROCUREMENT OF SUBSTITUTE GOODS OR SERVICES; LOSS OF USE, DATA, OR PROFITS; OR BUSINESS INTERRUPTION) HOWEVER CAUSED AND ON ANY THEORY OF LIABILITY, WHETHER IN CONTRACT, STRICT LIABILITY, OR TORT (INCLUDING NEGLIGENCE OR OTHERWISE) ARISING IN ANY WAY OUT OF THE USE OF THIS DIY, EVEN IF ADVISED OF THE POSSIBILITY OF SUCH DAMAGE.
If you understand the inherent risks and agree with the above disclaimer, proceed with caution.
TESTED USE CASES
INPA 5.0.6:
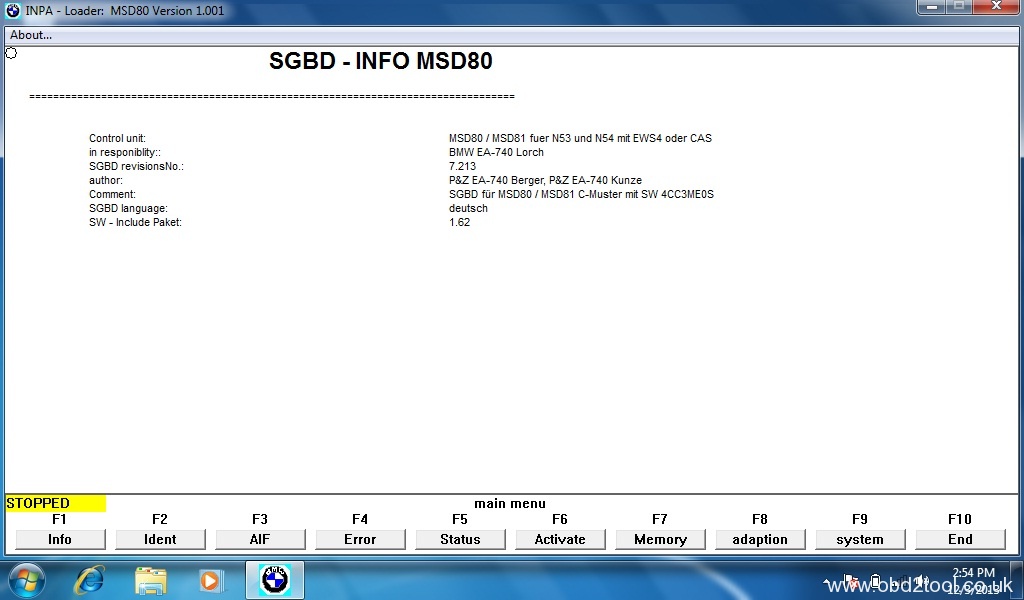
- MSD80 / MSD81 fuel injector volume calibration
- Register new battery and reset histogram
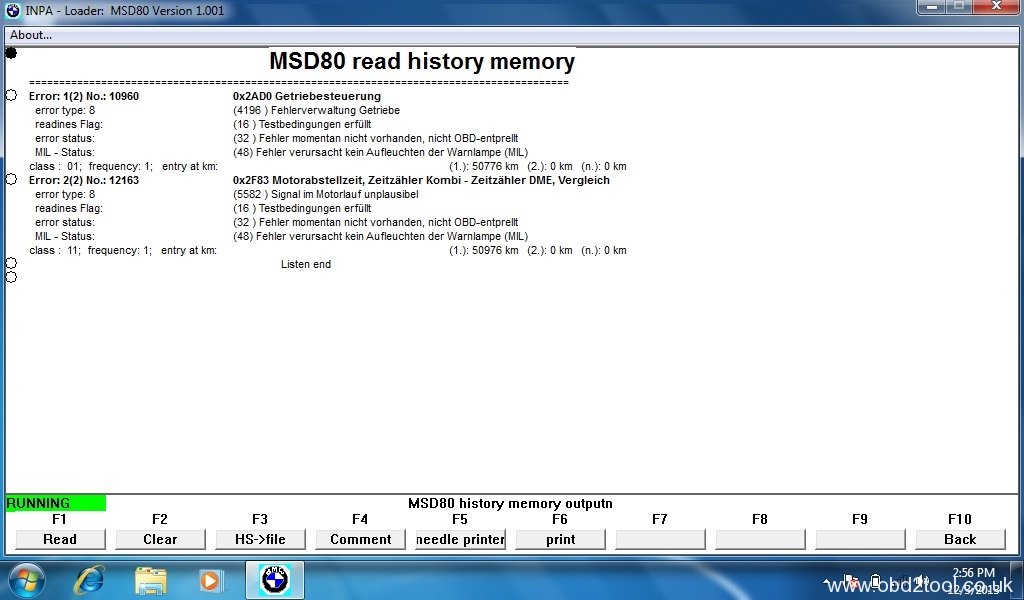
- Read and clear MSD80 / MSD81 history memory
- Display plant, dealer, and backup integration levels
- Display UIF data for all control modules (module name and address, ZB number, VIN number, date of last flash)
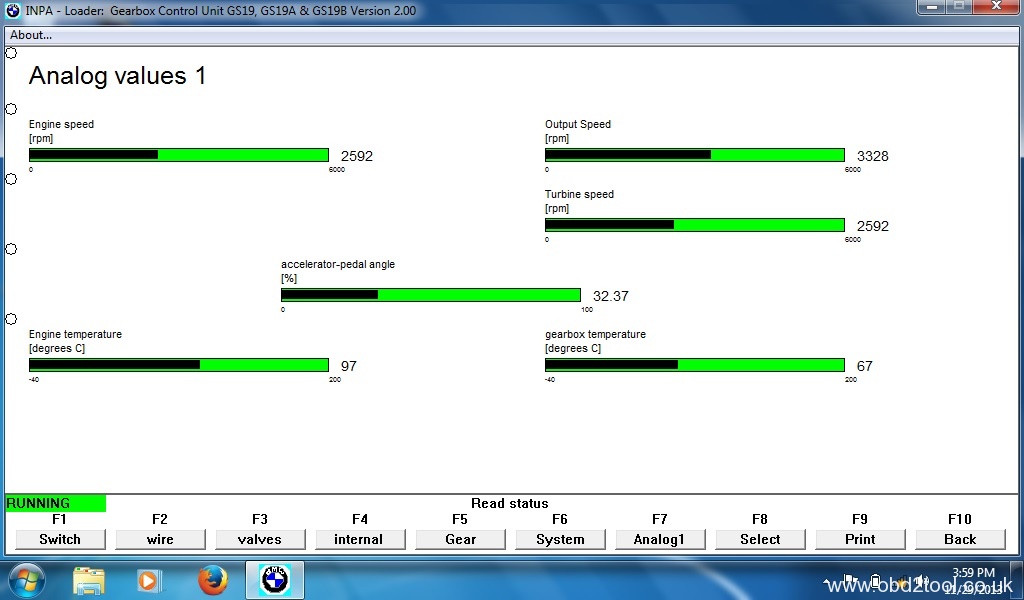
- Display gearbox control unit (TCU) analog values (engine/gearbox temperature, turbine speed, accelerator pedal angle, etc.)
NCS-Expert 4.0.1:
- Battery retrofit (flooded to AGM); updated VO and default coded CAS
- Enable digital speedometer
- Enable fog lights to remain on when high beams are flashed
- Disable door chime when ignition is off and key fob is inserted
- E92 corner bulb delete
WinKFP 5.3.1:
- Flash reprogramming of ZF 6HP21 TCU
Rheingold ISTA 3.40.30/3.41.10:
- Leverages BMW Standard Tools 2.12 EDIABAS interface for vehicle diagnosis, no ISIS workshop server required (outside the scope of this DIY)
KNOWN LIMITATIONS
- MEVD17.2 DME and N55 engine not supported, E90 German language development script required (outside the scope of this DIY)
- DDE 7.3 and M57 engine not supported, E90 German language development script required (outside the scope of this DIY)
- 2009+ electronic fuel pump control module (EKPM3) not supported (HW-NR 7276383), F30 German language development script required (outside the scope of this DIY)
- GS40 DCT gearbox control unit (TCU) not supported, German language development script required (outside the scope of this DIY)
- Language variant and version mismatch errors will be displayed and can be safely ignored. When you integrate the German metric ECU description files and group files from the SP Daten, the language variants do not match and the ECU description files are newer than anticipated.
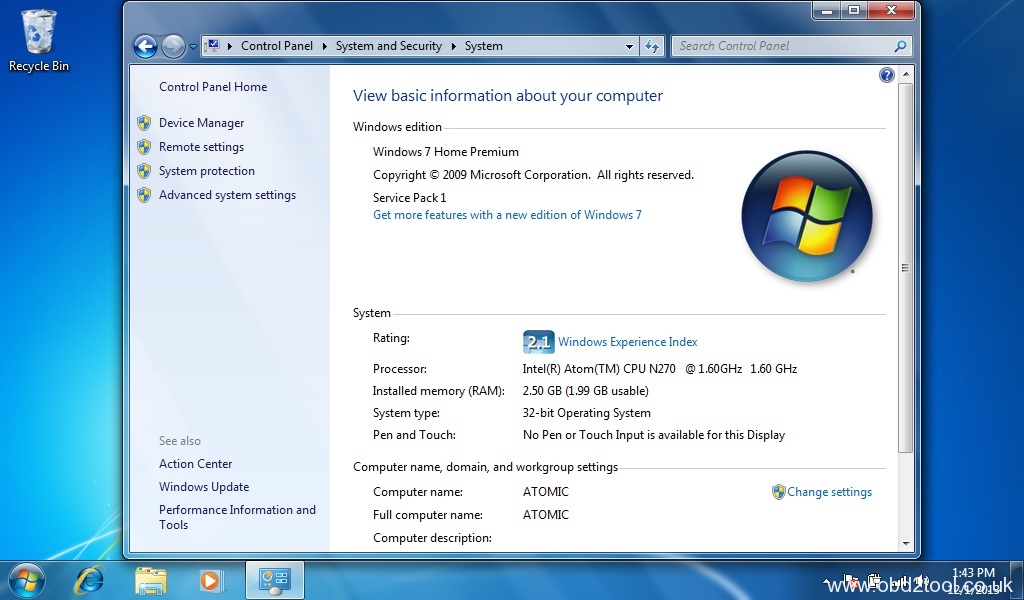
This DIY was tested with Windows 7 Home Premium Service Pack 1 (SP1) running on a circa 2008 Lenovo S10 netbook with a K+DCAN cable from one stop electronics.com. My netbook is used solely for coding and as such this DIY assumes that your computer is dedicated to this purpose as well.
I recommend starting with a fresh 32-bit Windows 7 installation in order to collect the necessary INPA 5.0.2 configuration files that you will need after installing BMW Standard Tools 2.12. I suggest disabling Windows Update automatic updates during the Windows 7 installation process. After entering your product key, the following screen will appear:
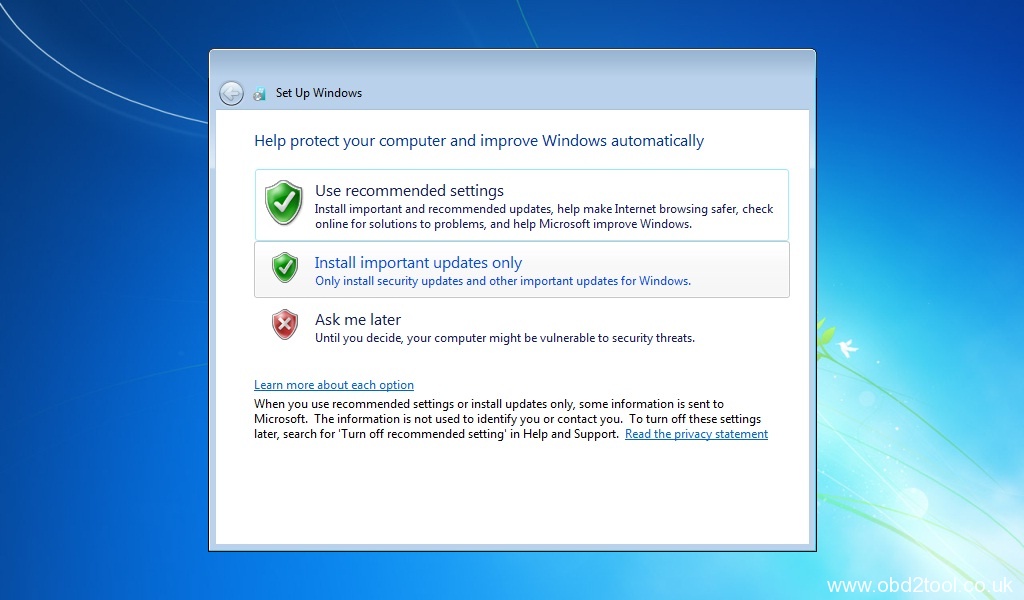
Select “Ask me later”, this will prevent Windows 7 from automatically installing any updates.
If your installing from pre-SP1 Windows 7 media, I highly recommend that you manually install two Microsoft updates:
System Update Readiness Tool (KB947821):
http://www.microsoft.com/en-us/downl…s.aspx?id=3132
Windows 7 Service Pack 1 (KB976932):
http://www.microsoft.com/en-us/downl…s.aspx?id=5842
During testing pre-SP1 Windows 7 no longer displayed a mouse pointer after successfully installing EDIABAS & WinKFP and rebooting the system.
INPA 5.0.2 can be found here:
INPA-EDIABAS full English Edition
Installation Guide
Follow steps 2 through 6 of the installation guide. During the EDIABAS & WinKFP install (step 3), select Windows XP (this is not mentioned in the installation guide.) For all other selections, accept the default and click Weiter which is German for “further.”

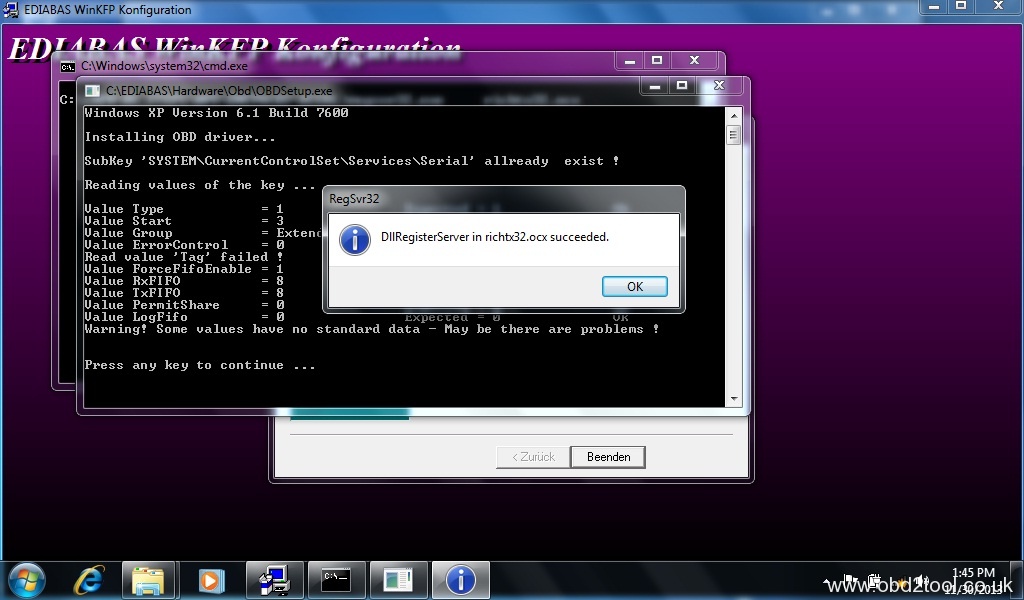
The very first time you attempt to install EDIABAS & WinKFP (step 3), regsvr32 will fail to register two Windows ActiveX controls. This is normal, upon re-installation everything will work properly.

Click on OK and then click on the large red circle with a white X at the bottom of the screen to see the second regsvr32 error.

Click on OK to acknowledge the second error.
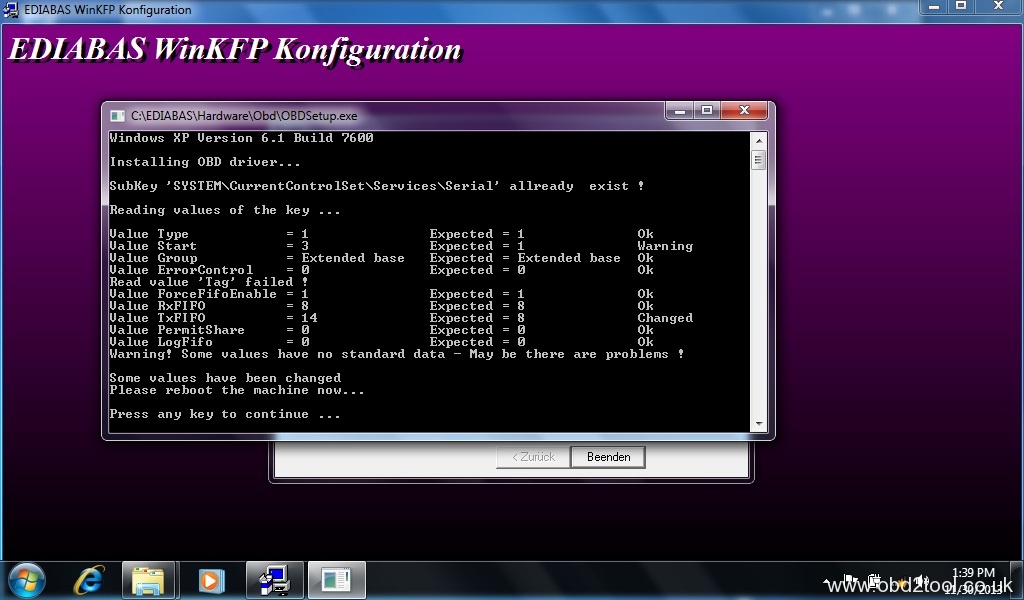
Press any key to exit the EDIABAS OBD setup program. Don’t be concerned about any registry key warnings, this installation of EDIABAS will never be used.
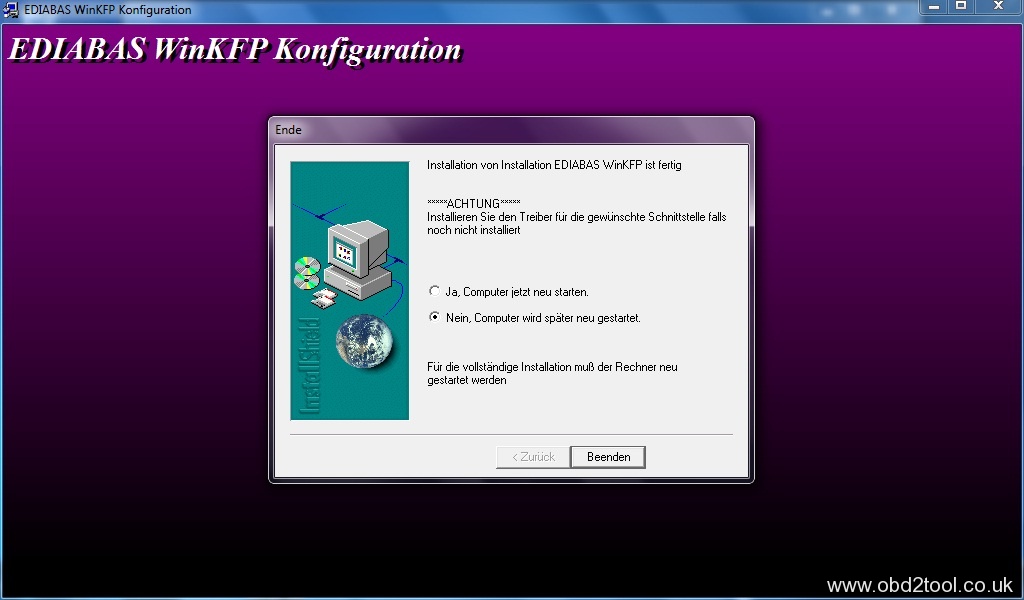
When prompted to reboot, select Nein for “No” and then click on Beenden or “End” to exit the installation program. Go to Control Panel and uninstall the program.
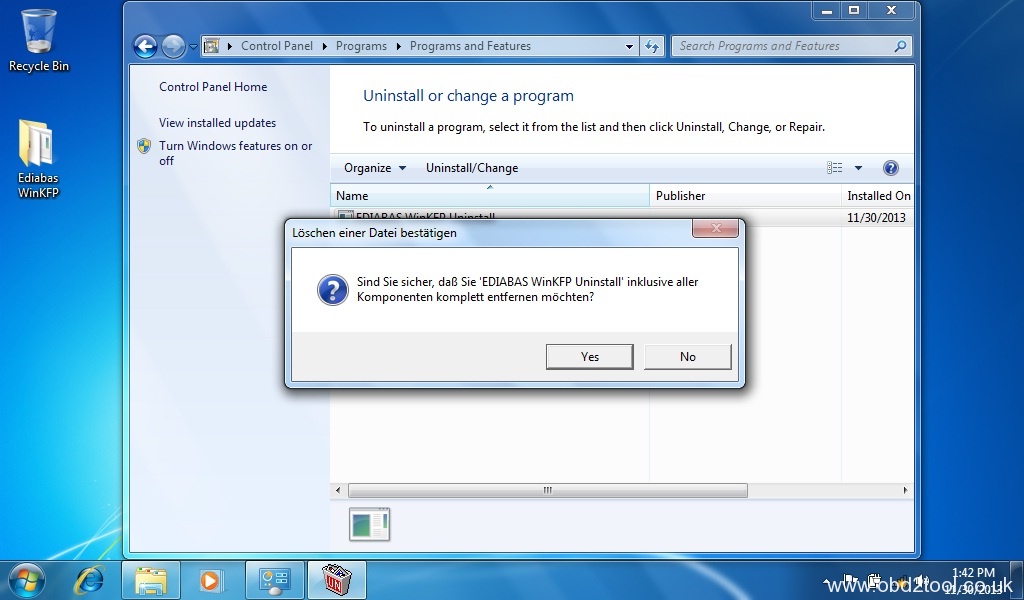
Once you have uninstalled the program, reinstall it. On the second attempt, the ActiveX controls will register properly.

This time, select Ja for “Yes” and reboot.

Even with SP1 installed, on occasion the system will no longer display a mouse pointer after rebooting the system at this point. If this happens, depress the Windows logo key (on some keyboards it may have an icon of a house instead) to display the Start menu. Depress the right arrow key once and then depress Enter to initiate a proper shutdown. When powered back on, the system should have a functional mouse pointer.
Continue with steps 4-6 in the installation guide.
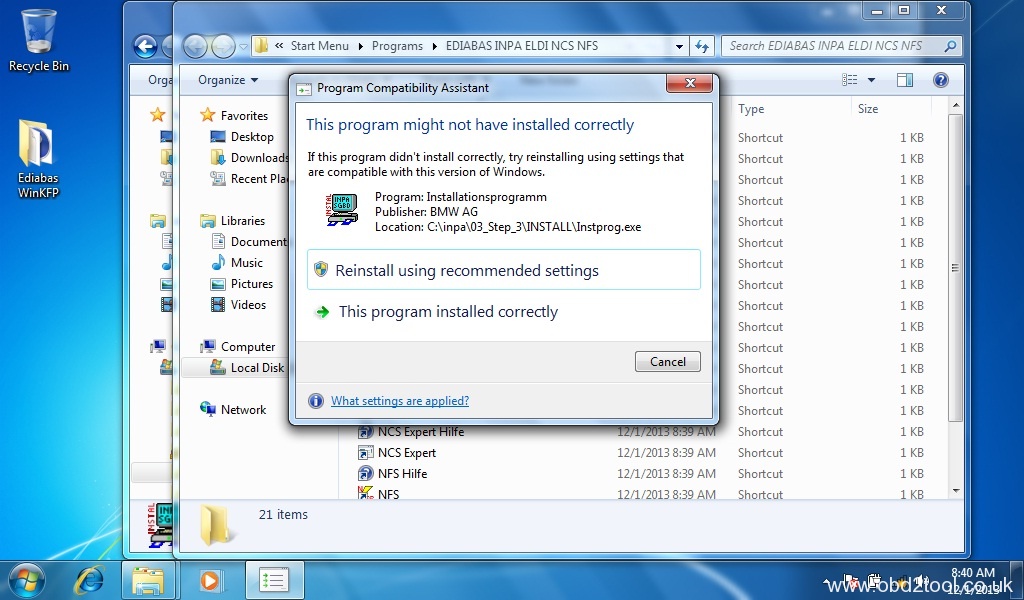
At the completion of step 5, the Windows Program Compatibility Assistant may appear. Click on “This program installed correctly.”
At this point you could optionally install the latest EDIABAS/INPA update (ES-76) from FAL’s EA-90X distribution. I don’t recommend doing so as the latest INPA scripts are in German and not necessary for coding. Installation of the ES-76 update is outside of the scope of this DIY.
You now have the base INPA scripts and configuration files that you’ll need to get the latest version of INPA (5.0.6) up and running. Copy the the INPA CFGDAT and SGDAT folders to removable media for safe keeping. They are located in C:\EC-APPS\INPA.
If your curious, INPA 5.0.2 is operable at this point. If you were to install the K+DCAN drivers from Windows Update, set the cable to COM1, etc. the battery and ignition clamps are working properly.
That’s cool, but INPA 5.0.2 and friends are not totally compatible with the latest SP Daten files (i.e. 50.2), so let’s move on to installing BMW Standard Tools 2.12.
Links to BMW Standard Tools 2.12 and NCS Expert profiles can be found in this post:
http://www.e90post.com/forums/showpo…postcount=4476
SP Daten 50.2 can be found in this thread:
http://www.e90post.com/forums/showthread.php?t=882353
Blow away your previous installation of Windows and start over with a fresh install. INPA 5.0.2 and friends made changes to the Windows registry, etc. Now that we have the two folders needed to bootstrap INPA 5.0.6, it’s best to reinstall Windows. If your installing from pre-SP1 Windows 7 media, don’t forget to install the System Update Readiness Tool (KB947821) and Windows 7 Service Pack 1 (KB976932.) In addition, because this will hopefully be your final re-installation of Windows I suggest that you manually install one additional Microsoft update:
Microsoft .NET Framework 4.5.1:
http://www.microsoft.com/en-us/downl….aspx?id=40779
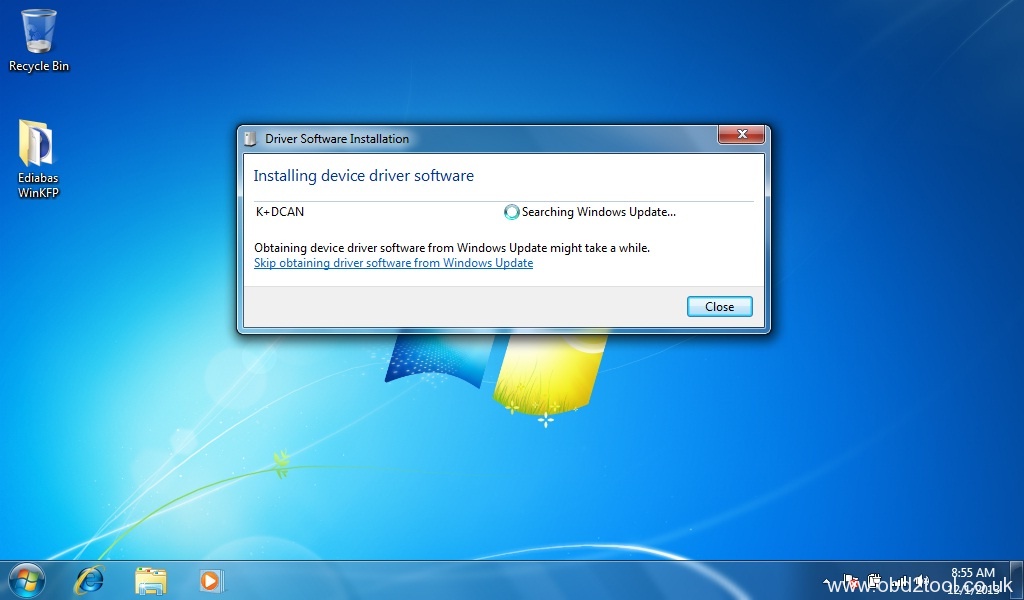
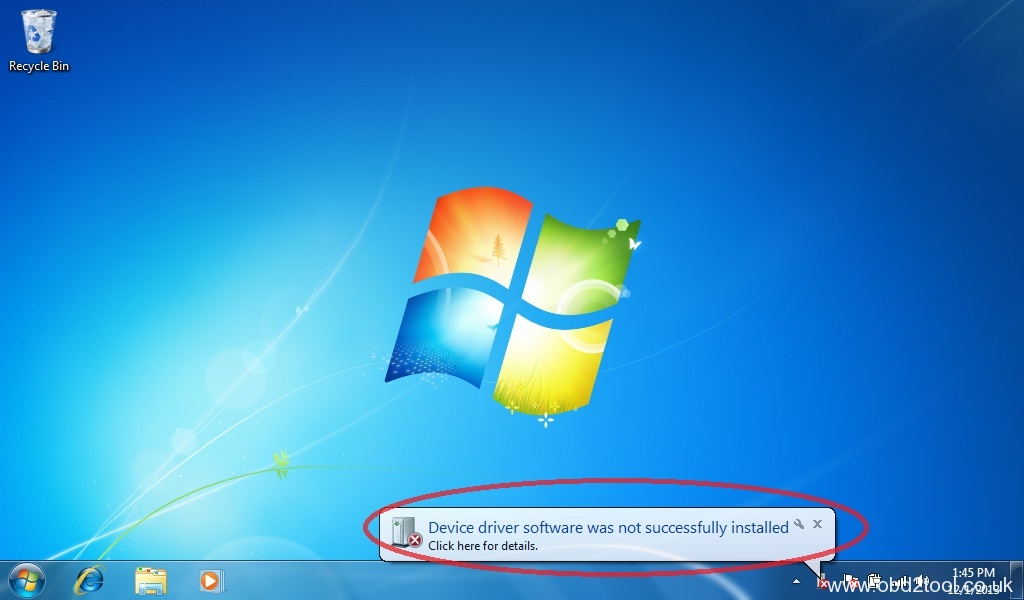
When the K+DCAN cable is initially plugged in, Windows will indicate that the device driver was not successfully installed.
Click on the white box circled above when it appears to change the driver update settings.
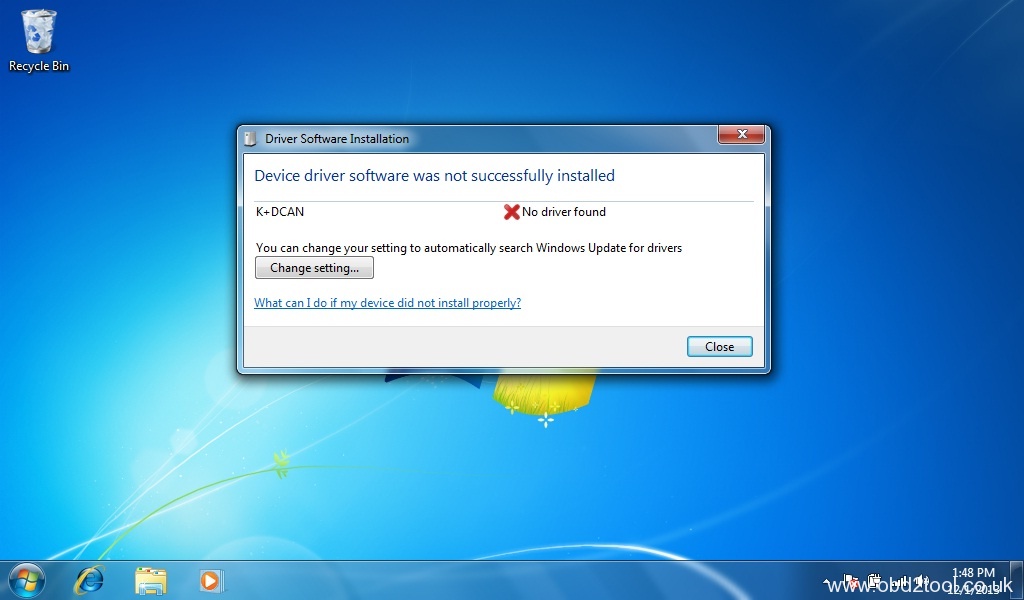
Click on “Change setting.”

Select “Always install the best driver software from Windows Update” then click on “Save Changes.”
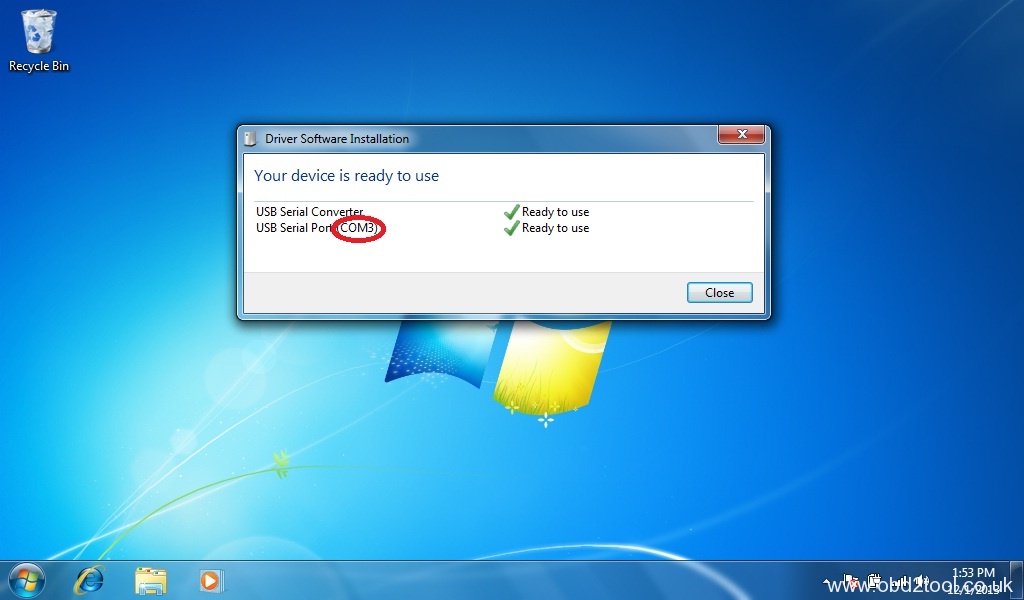
Windows Update will install the latest FTDI drivers needed for the one stop electronics.com K+DCAN cable. Notice that the FTDI driver has defaulted to USB Serial Port COM3. You need to change this to COM1. Click on “Close.”
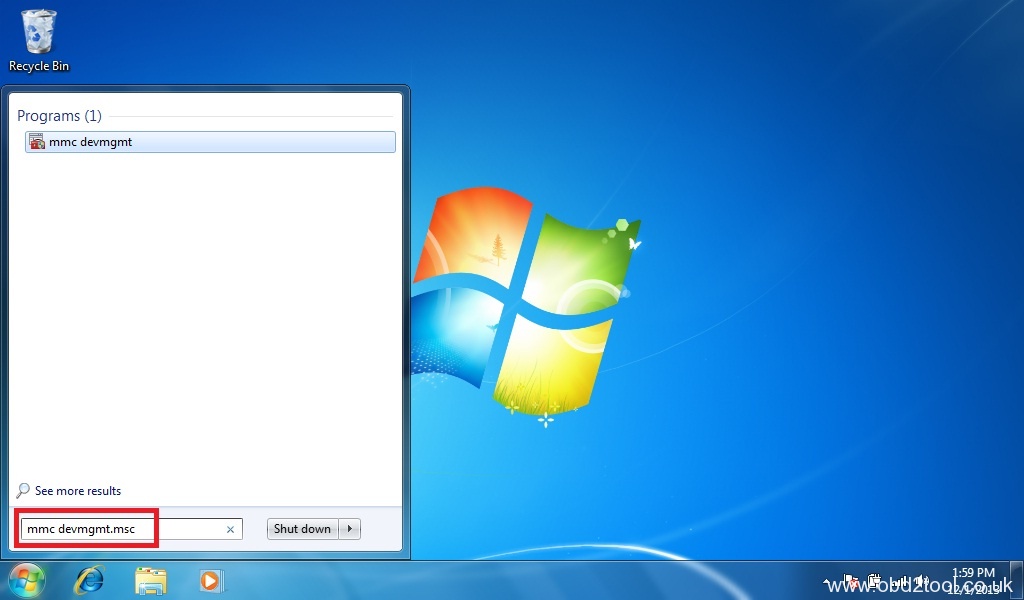
Click on the Windows Start button to display the Start menu. In the Start Search box type the following command and depress Enter to launch Device Manager:
Code:
mmc devmgmt.msc

When Device Manager opens, click on the arrow to the left of “Ports (COM & LPT)” to expand the Ports device tree. Double-click on “USB Serial Port (COM3)” to open the device properties.
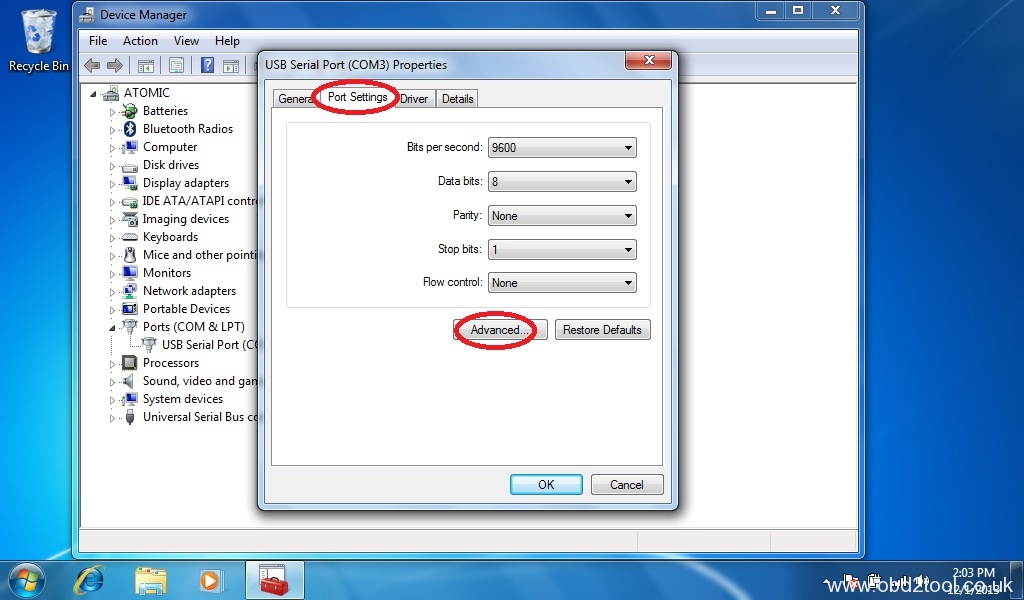
Click on the “Port Settings” tab and then click on the “Advanced” button to display the Advanced Settings for COM3.
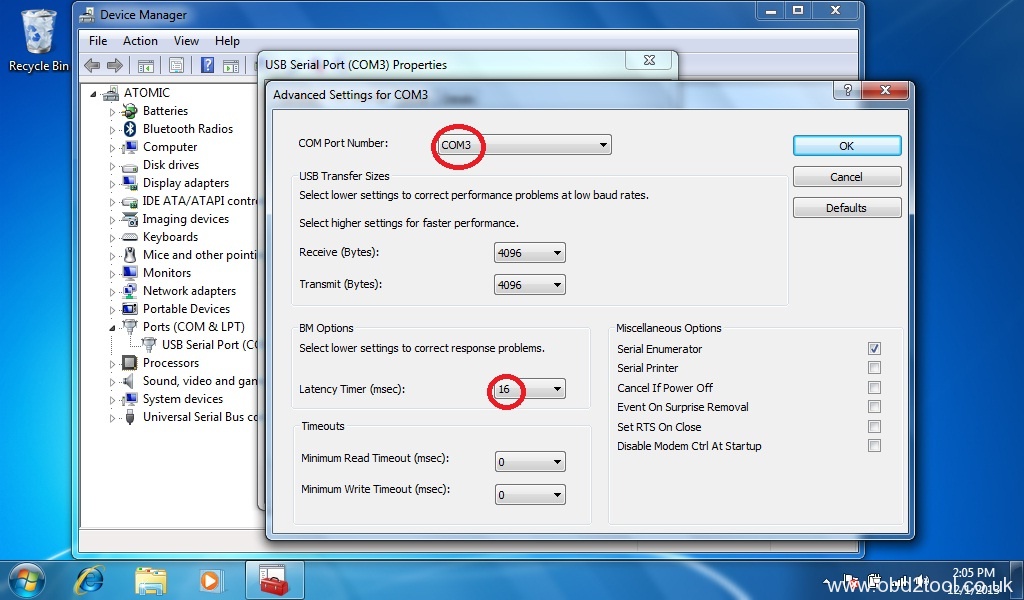
Change the COM Port Number to COM1 and the Latency Timer to 1 msec and click “OK.”
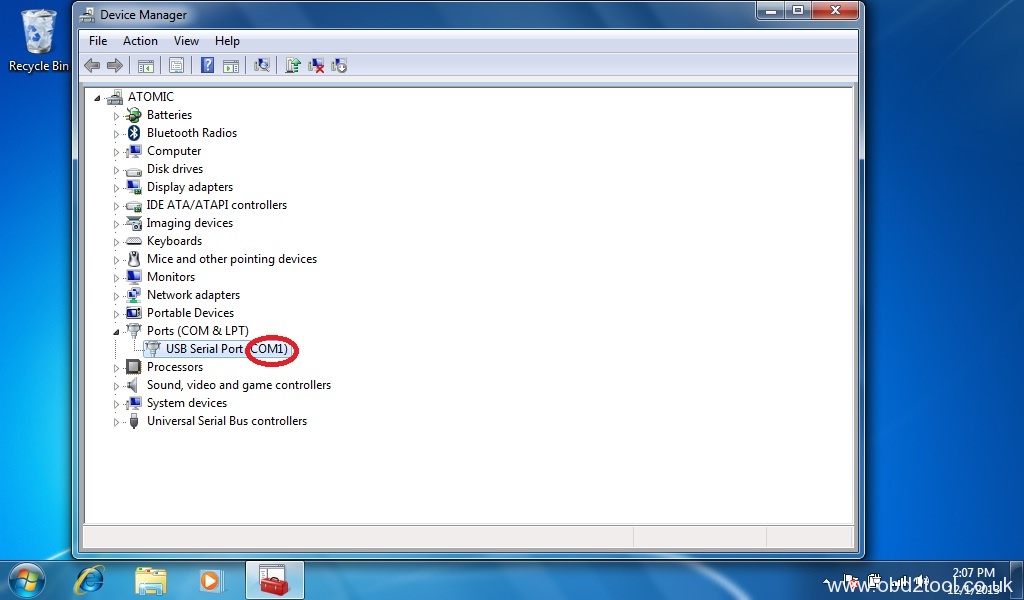
The USB Serial Port should be set to COM1. Close Device Manager.
Install BMW Standard Tools 2.12. Accept the defaults and click “Next.”

When prompted to select additional tasks, de-select the “Execute backup and restore wizard” selections under Data backup. You don’t have an existing installation of BMW Standard Tools to backup. Click “Next.”
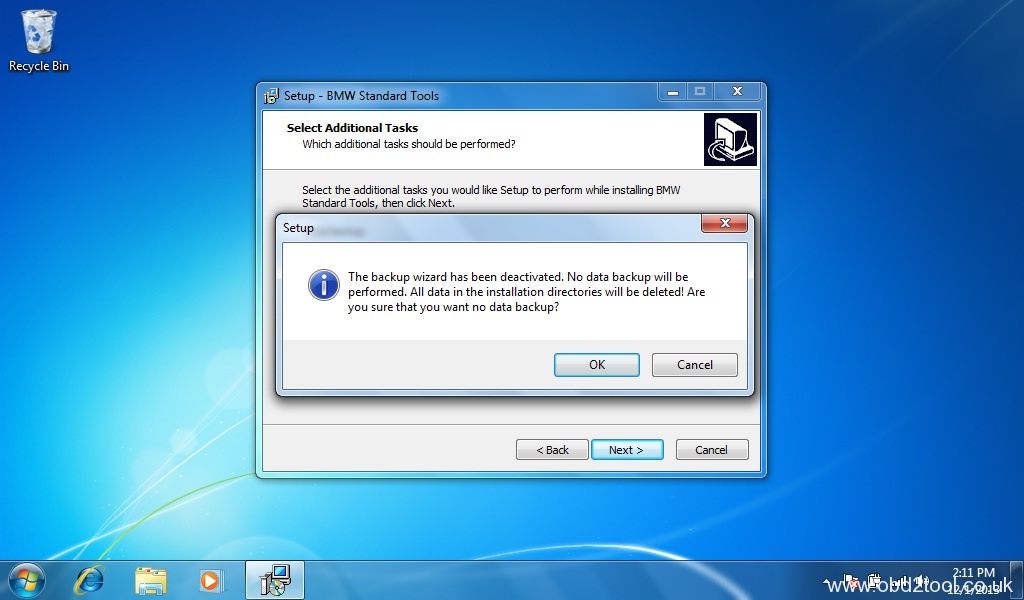
Click “OK” to acknowledge that the backup wizard has been deactivated.
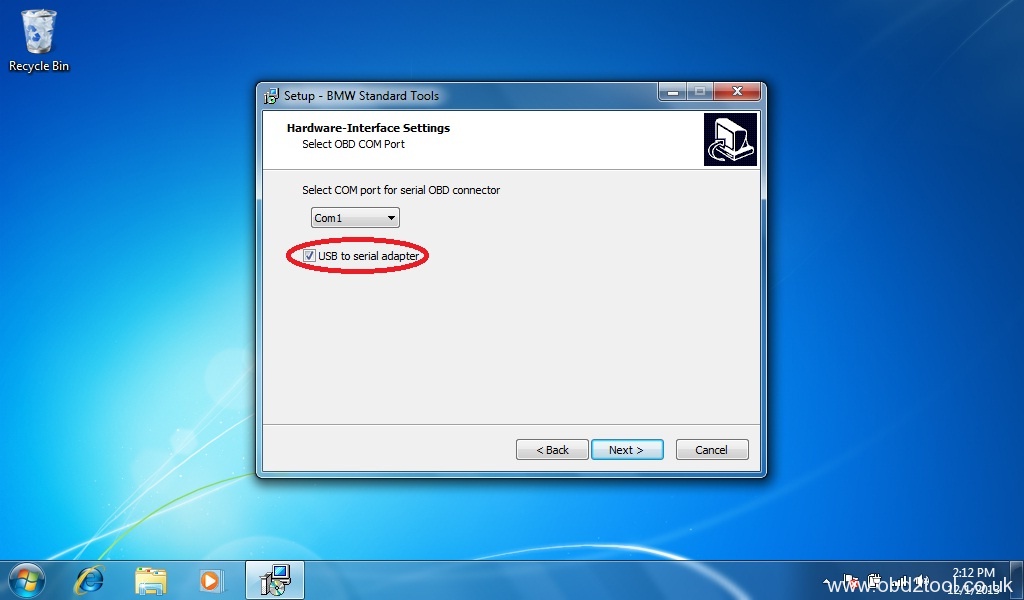
When the Hardware Interface Settings screen appears, select “USB to serial adapter” then click “Next.”
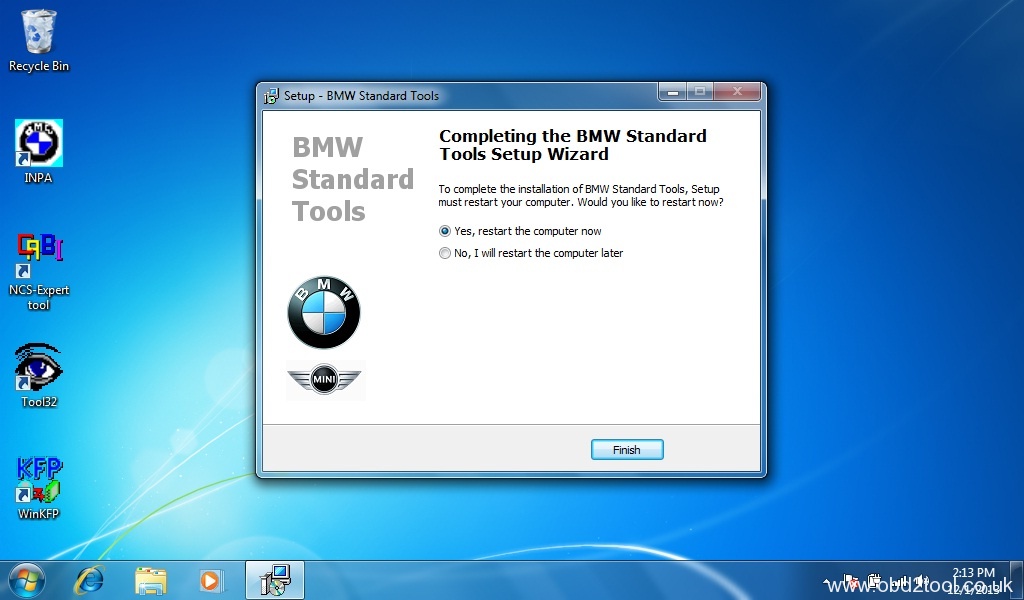
Click “Finish” to complete the BMW Standard Tools setup and restart your computer.
Please note: This section of the DIY could be improved for neophyte Windows users. It assumes that you understand command line syntax. In this context, X: denotes an unknown drive letter (i.e. the USB thumb drive that you saved your INPA CFGDAT and SGDAT folders to.) For example, if in Windows Explorer under Computer your USB thumb drive is denoted as Drive E:, then you should use E: instead.
Code:

If you chose to store the CFGDAT folder in another folder named MyStuff, then you would have to include MyStuff in the source path.

The drive letter and path to the source file(s) is dependent on where you stored the files.
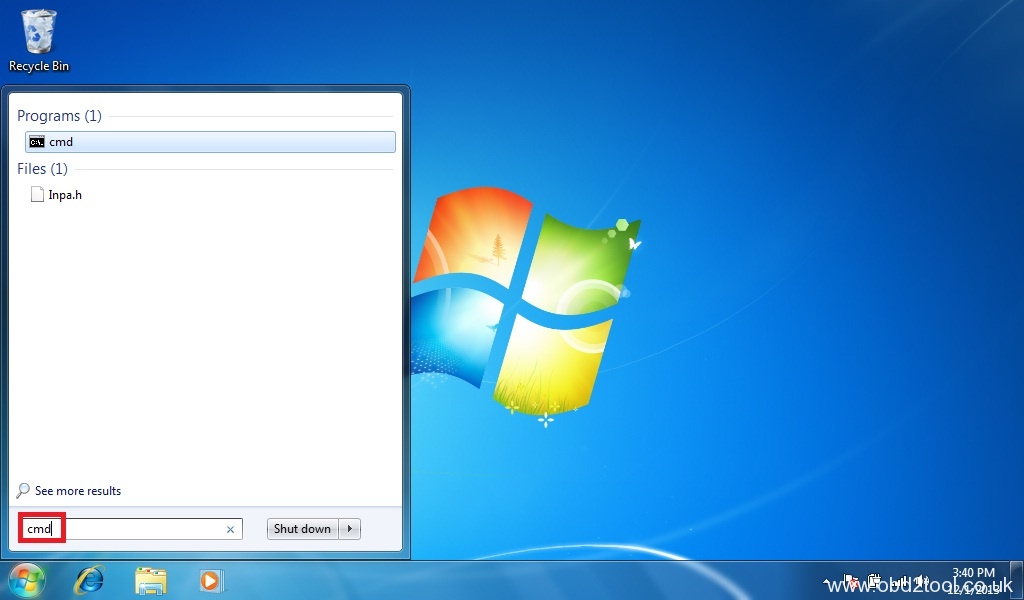
Click on the Windows Start button to display the Start menu. In the Start Search box type the following command. Right click on the Windows Command Processor (cmd) under Programs and select Run as administrator.
Code:
![]()
When the User Account Control dialog box appears, select Yes to allow the Windows Command Processor to make changes to your computer.
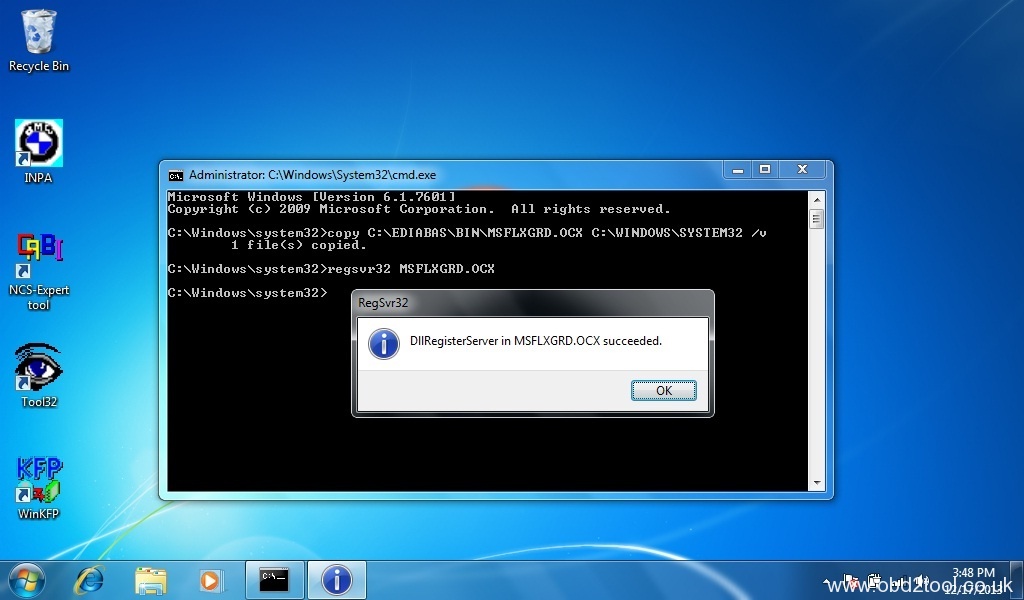
Copy the Windows ActiveX control MSFLXGRD.OCX to C:\WINDOWS\SYSTEM32 and manually register it.
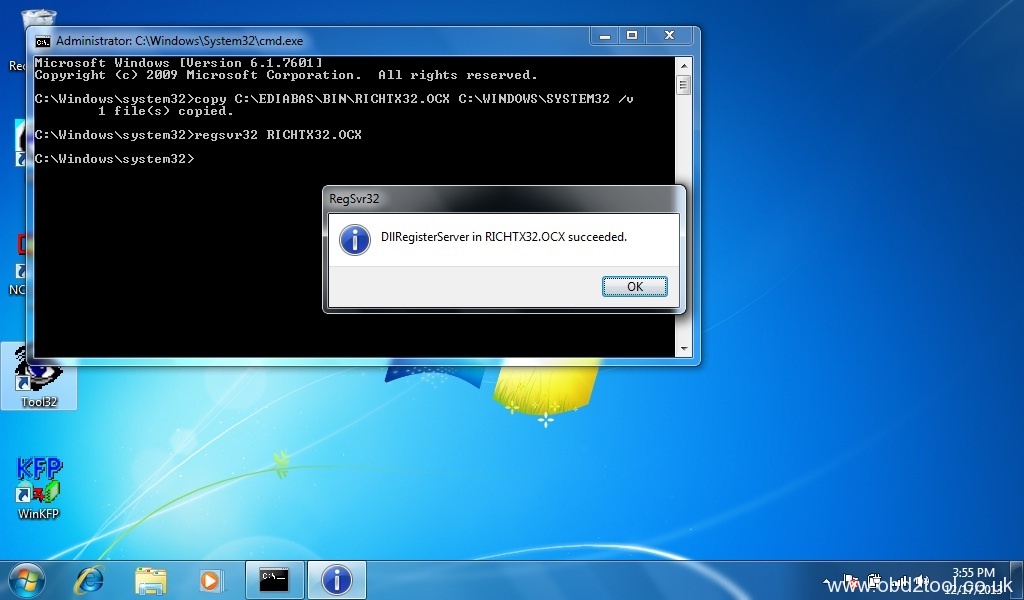
Copy the Windows ActiveX control RICHTX32.OCX to C:\WINDOWS\SYSTEM32 and manually register it.
Overwrite the INPA initialization file in the C:\EC-APPS\INPA\CFGDAT folder with the INPA.INI from your saved CFGDAT folder.
Code:

Copy the INPA scripts and configuration files from your saved CFGDAT and SGDAT folders.
Code:

Copy the group files from the SP Daten E89 folder to C:\EDIABAS\ECU.
Code:

Import your daten files into WinKFP using this guide (steps 2-8):
WinKFP Import.pdf
Create a C:\NCSEXPER\DATEN\E89 folder and copy the contents of the E89\DATEN folder into it.
Code:

Copy the contents of the E89\SGDAT folder to C:\NCSEXPER\SGDAT.
Code:

Go to the E89\DATEN directory and execute the LADEN.BAT script.
Code:

You’ll receive errors at the end of the script due to the missing C:\EC-APPS\CARSERVER directory, ignore them.
Install the patched 32-bit NCS Expert from this thread:
http://www.e90post.com/forums/showthread.php?t=832476
Example:
Code:

Copy the NCS Expert profiles to the C:\NCSEXPER\PFL folder.
Example:
Code:
![]()
Your done, enjoy! If you found this DIY useful, please click on the Appreciate button at the bottom of this post.