
Launch X431 HD III, replacement of X431 V+ HD module 2017, is an advanced heavy duty truck diagnostic tool in the 2019 year.
Launch X431 HD III full package:


1) It is simple for the VCI (Vehicle Communication Interface) to communicate with X-431 V+.
2) X-431 V+ adopts a higher performance-price ratio tablet computer, which is equipped with Android 7.1 operating system, 1.4GHz quad-core CPU and 10.1″ HD display.
3) Equipped with an exclusive X-431 V+ protective sleeve to prevent it from being damaged.
4) Comes with lots of adapters and cables, that means X-431 V+ can diagnose the electronic control system of prevailing vehicle models covering Asian, European, American and Chinese.
5) Wireless communication between VCI and X-431 V+ tablet
6) full car model and full system vehicle trouble diagnosis:
Reading DTCs, Clearing DTCs, Reading Data Stream, Actuation Test and Special Functions.
There are two product configurations available for X-431 V+.
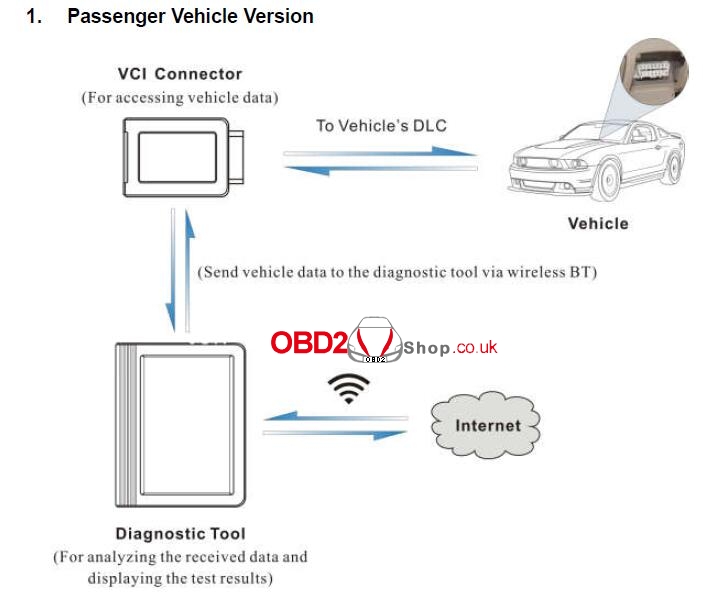
1. Passenger Vehicle Version
2. Commercial Vehicle version
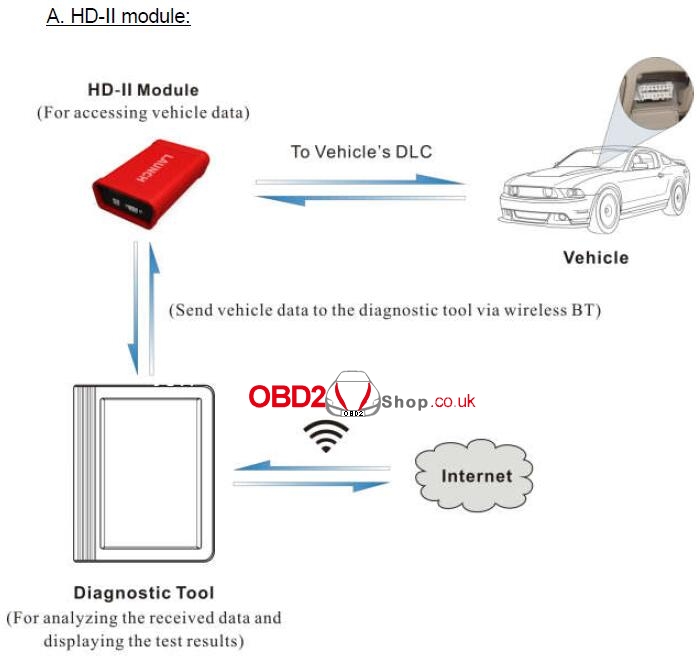
X-431 V+ is compatible with the following two Heavy-duty VCI modules. For different VCI modules, the communication methods vary.
Below shows how the X-431 V+ system works.
A. HD-II module:
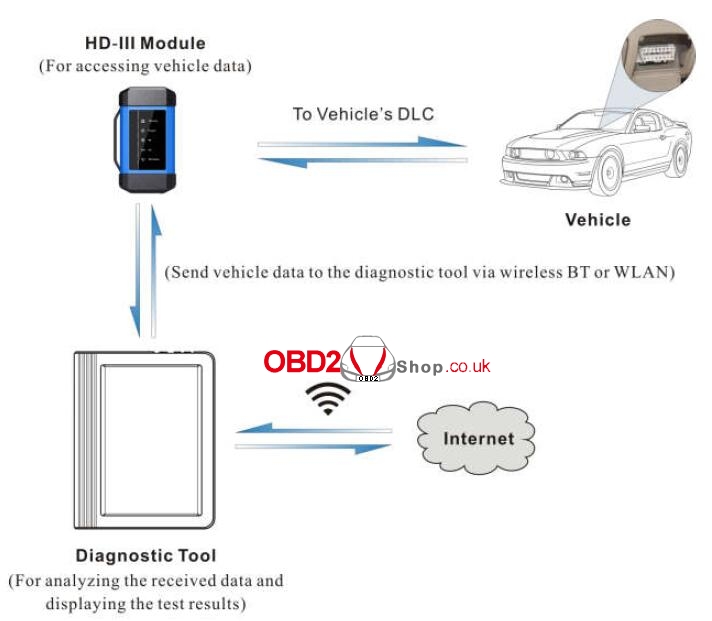
B. HD-III module:
Besides the BT communication, the HD-III VCI module comes loaded with a built-in WLAN module, which can work as a wireless hotspot or a network adaptor.
Below shows how the X-431 V+ system works.
X431 HD III 2019 quick start guide:
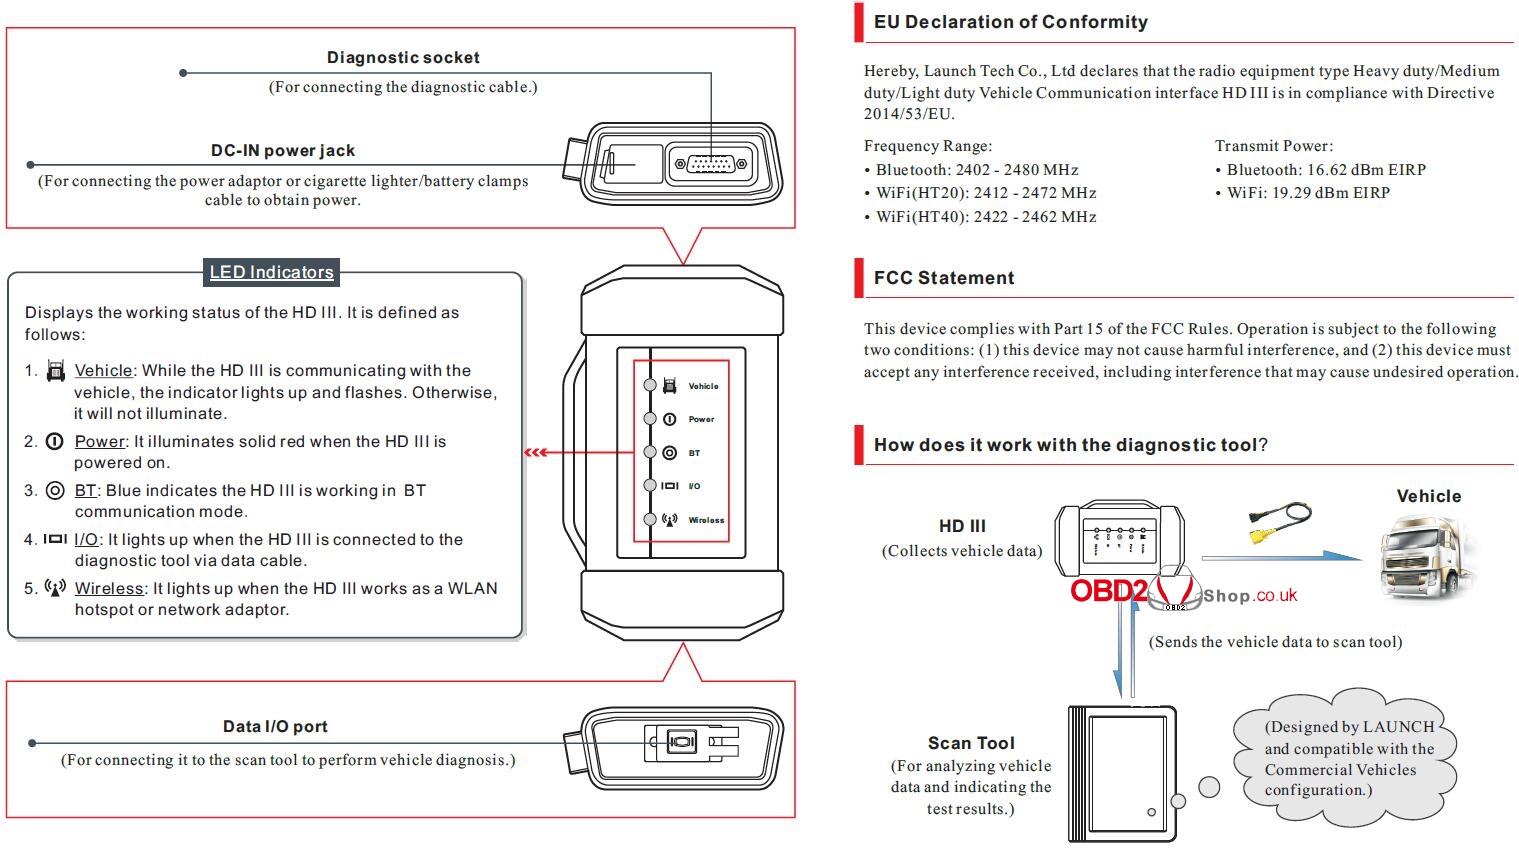
How does X431 HDIII work?
The HD III works as a vehicle communication interface device, which is used to read the vehicle data and then send it to the diagnostic tool via BT/WLAN communication or data cable connection.
The LED indicators enable you to easily identify the working status of the HD III.
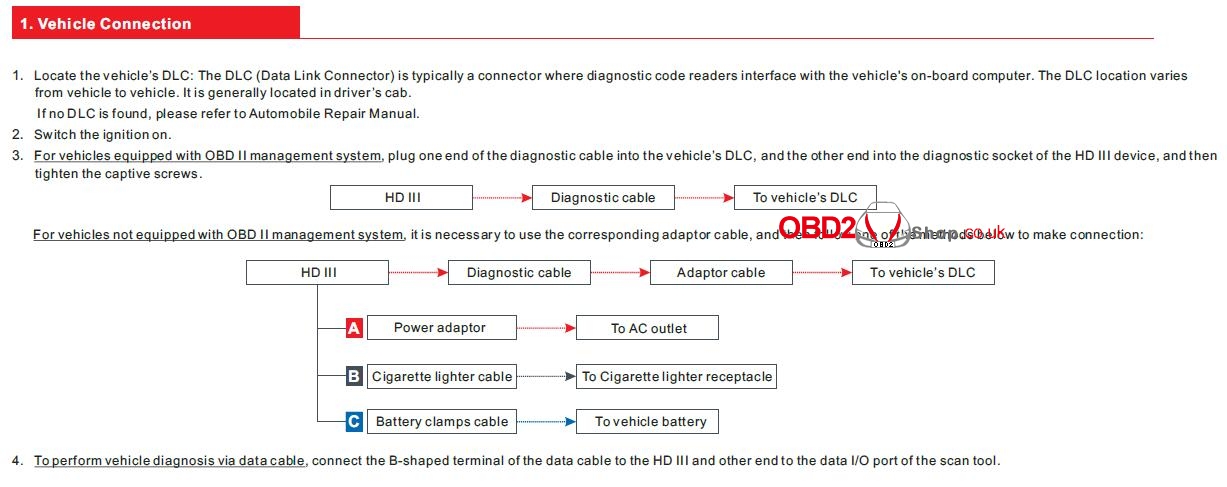
 1. Vehicle connection of X431 HD III
2. X431 HD III WLAN communication setup.
To establish the WLAN communication between the HD III and scan tool, proceed the following steps:
- Follow the steps mentioned in Section 1 to make a connection.
- Power the scan tool on and launch the diagnostic application
- After logging successfully, tap “Profile”)” -> “VCI Management (or “Diagnostic connector connection management)” -> select “Use Wi-Fi communication”, a pull-down option list appears:
1) Work as WLAN hotspot
Once enabled, the HD III and scan tool form a LAN network to make communication. In this case, the scan tool cannot surf the Internet.
2) Work as Network adaptor (Recommended)
Once enabled, a WLAN connection dialog box appears. Input the network name and access password until it is properly connected. In this case, the scan tool can surf the Internet and communicate with HD III.

3. Activate HD III & Download software
If you had a diagnostic tool of 12V passenger car configuration and intend to extend the diagnostics of commercial vehicles, follow the steps described below to activate the HD III:
Note: Please make sure that the diagnostic tool is properly connected to the Internet before proceeding this step.
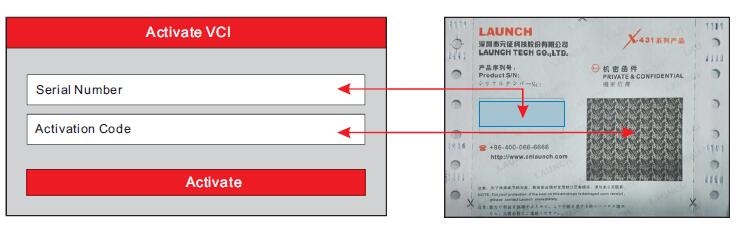
- Launch the application, and log in the system using the existing user account of Passenger Vehicle Configuration, and then tap “Personal Center (or )” -> “Activate VCI (or “Activate Connector )”.
- Input the Product S/N and Activation Code, which can be found in the supplied Password Envelope, then tap “Activate” to activate the HD III.
- Tap “Update” to enter update center, tap “Update” to download and install the diagnostic software of Commercial vehicles.
- After the software download is complete, a new “Heavy-duty” tab will appear on the Diagnostic main menu screen.
4. Toggle Between Passenger and Commercial Vehicles
If several VCI connectors and HD III devices are activated on the diagnostic tool, a list of connectors will be displayed in the “VCI (or “My Connector”)”, which can be accessed by tapping
“Personal Center (or “Profile”)”.
1) Switch from a passenger car to a commercial vehicle
If you want to switch from a passenger car to a commercial vehicle, enter “VCI (or “My Connector”) -> select the HD III S/N (starting with 98649) -> Return to the diagnostic main menu -> connect the HD III, diagnostic tool and vehicle -> tap “Heavy-duty” tab to select the corresponding vehicle model -> follow the on-screen prompts to start a diagnostic session.
2) Switch from a commercial vehicle to a passenger car To switch from a commercial vehicle to a passenger car, enter “VCI (or “My Connector”) -> select the VCI connector S/N -> Return to the diagnostic main menu -> connect the VCI connector, scan tool and vehicle -> Use VINScan(or manual diagnosis) to start diagnosis.
5. Start Diagnostics with X431 HD III
Follow the sequence below to start a new diagnostic session.

Free download 2019 X431 HD III user manual
TABLE OF CONTENTS
1 INTRODUCTION ……………………………………………………………………………….. 1
1.1 PRODUCT PROFILE ………………………………………………………………………… 1
1.2 FEATURES …………………………………………………………………………………… 3
1.3 KNOWLEDGE OF X-431 V+ ……………………………………………………………… 4
1.3.1 X-431 V+ tablet …………………………………………………………………….. 4
1.3.2 VCI connector (Only for Passenger Vehicle Version) ………………….. 6
1.3.2 VCI module (Only for Commercial Vehicle Version) ……………………. 7
1.4 TECHNICAL PARAMETERS ……………………………………………………………….. 9
1.4.1 X-431 V+ tablet …………………………………………………………………….. 9
1.4.2 VCI connector (Only for Passenger Vehicle Version) ………………… 10
1.4.2 VCI module (Only for Commercial Vehicle Version) ………………….. 10
1.5 PACKAGE LIST (FOR PASSENGER VEHICLE VERSION) …………………………. 11
1.5 PACKAGE LIST (FOR COMMERCIAL VEHICLE VERSION) ………………………… 12
2 PREPARATIONS ……………………………………………………………………………… 15
2.1 CHARGING X-431 V+ ……………………………………………………………………. 15
2.2 USING YOUR BATTERY ………………………………………………………………….. 15
2.3 POWER ON/OFF …………………………………………………………………………… 16
2.3.1 Power on ……………………………………………………………………………. 16
2.3.2 Power off ……………………………………………………………………………. 16
2.4 TIPS ON FINGER OPERATIONS ………………………………………………………… 16
2.5 SCREEN LAYOUT …………………………………………………………………………. 16
2.6 ADJUST BRIGHTNESS ……………………………………………………………………. 17
2.7 SET STANDBY TIME ………………………………………………………………………. 17
2.8 CHANGING LANGUAGE ………………………………………………………………….. 17
3 NETWORK SETUP ………………………………………………………………………….. 18
3.1 CONNECT TO WLAN ……………………………………………………………………. 18
3.2 DISCONNECT FROM A WLAN NETWORK ……………………………………………. 18
4 HOW TO DIAGNOSE ……………………………………………………………………….. 19
4.1 DIAGNOSIS FLOWCHART ……………………………………………………………….. 19
4.2 USER REGISTRATION, CONNECTOR ACTIVATION & DIAGNOSTIC SOFTWARE
DOWNLOAD …………………………………………………………………………………….. 19
4.2.1 User registration ………………………………………………………………….. 19
4.2.2 Diagnostic software layout ……………………………………………………. 22
4.2.3 Function menu ……………………………………………………………………. 23
4.3 CONNECTIONS ……………………………………………………………………………. 23
4.3.1 Preparation…………………………………………………………………………. 23
4.3.2 DLC location ………………………………………………………………………. 23
4.3.3 Vehicle connection (For Passenger Vehicle Version) ………………… 24
4.3.3 Vehicle connection (For Commercial Vehicle Version)……………….. 26
4.4 COMMUNICATION SETUP (FOR PASSENGER VEHICLE VERSION) ……………. 27
4.4 COMMUNICATION SETUP (FOR COMMERCIAL VEHICLE VERSION) …………… 28
4.4.1 Pairing up via wireless BT …………………………………………………….. 28
4.4.2 WLAN communication ………………………………………………………….. 28
4.5 START DIAGNOSTICS ……………………………………………………………………. 32
4.5.1 Read DTC ………………………………………………………………………….. 34
4.5.2 Clear fault memory ………………………………………………………………. 35
4.5.3 Read data stream ………………………………………………………………… 35
4.5.4 Special function …………………………………………………………………… 38
4.5.5 How to view History? ……………………………………………………………. 39
4.5.6 Reset Service ……………………………………………………………………… 39
4.6 REPAIR DATA ……………………………………………………………………………… 42
4.7 UPDATE …………………………………………………………………………………….. 42
4.8 PROFILE ……………………………………………………………………………………. 43
4.8.1 My connector………………………………………………………………………. 43
4.8.2 Diagnostic connector connection management ………………………… 43
4.8.3 Activate connector ……………………………………………………………….. 44
4.8.4 Firmware fix ……………………………………………………………………….. 44
4.8.5 My report ……………………………………………………………………………. 44
4.8.6 Profile ………………………………………………………………………………… 44
4.8.7 Change password ……………………………………………………………….. 44
4.8.8 Help ………………………………………………………………………………….. 44
4.8.9 Log out ………………………………………………………………………………. 44
4.9 SETTINGS ………………………………………………………………………………….. 45
4.9.1 Units of measurement ………………………………………………………….. 45
4.9.2 Orientation …………………………………………………………………………. 45
4.9.3 Print information ………………………………………………………………….. 45
4.9.4 Launch wireless printer connection ………………………………………… 45
4.9.5 Diagnostic feedback …………………………………………………………….. 48
4.9.6 Network test ……………………………………………………………………….. 48
4.9.7 About …………………………………………………………………………………. 48
5 OTHERS …………………………………………………………………………………………. 49
5.1 EMAIL ……………………………………………………………………………………….. 49
5.1.1 Configure an email account …………………………………………………… 49
5.1.2 Add an email account …………………………………………………………… 49
5.2 BROWSER ………………………………………………………………………………….. 49
5.2.1 Open browser……………………………………………………………………… 49
5.2.2 Download files …………………………………………………………………….. 50
5.3 SYNCHRONIZATION ………………………………………………………………………. 50
5.3.1 Connect to PC …………………………………………………………………….. 50
5.3.2 Run on PC …………………………………………………………………………. 51
5.3.3 Install an application …………………………………………………………….. 51
5.4 CLEAR CACHE …………………………………………………………………………….. 51
6 FAQ ……………………………………………………………………………………………….. 52
That’s all.
Thanks